Monday, December 19, 2011

3rd Rail Chord Symmetries (Part 3)

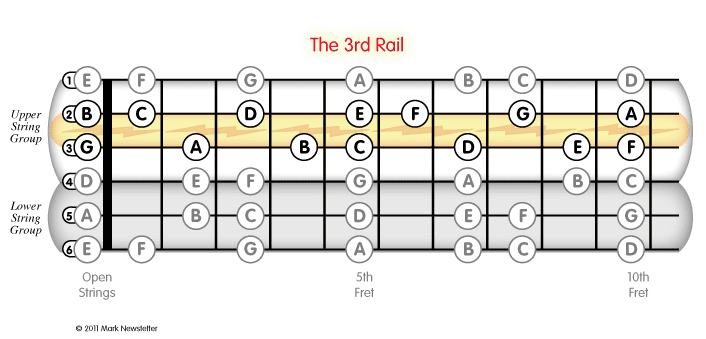
So far we've examined the 7th chord forms which radiate around the 3rd Rail – that problematic nexus of the 2nd and 3rd strings. By treating it as a fulcrum or the center of gravity of the fret board, it becomes a useful organizing element. No longer a problem, but a solution.

Here's the interval structure of the four types of diatonic 7th chords in the major keys, based on the major and minor 3rds which occur between each chord degree;

Dotted line separates symmetrical and asymmetrical chords based on their interval structure.

Notice that the major 7ths and minor 7ths have opposite interval structures. The same opposing symmetry is true of the V and VII chords. Because these symmetries are integral to the chords' structure, it's logical that they play out on the fret board as geometrically symmetrical patterns.

The center interval in each of these 7th chords spans the 3rd Rail. Only the minor 7th chords have a major 7th in their centers. It takes a change in perspective to think of chords from the center outward, rather than from the bottom up, but it will give you a much more sophisticated understanding of harmony and a greater command of the fret board.

––––

The three minor 7th chords are rooted on the 2nd, 3rd and 6th scale degrees of a major key. The major 3rds at the center of these chords are rooted on the 4th, 5th and 1st scale degrees, respectively.


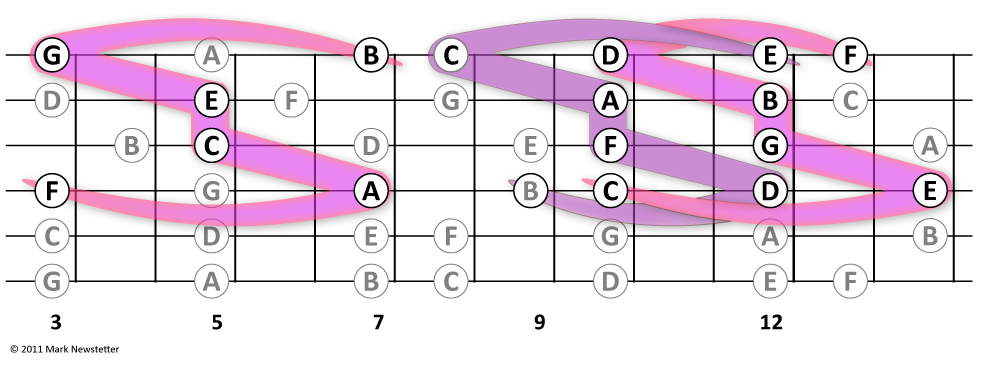
The I - IV - V center intervals on the 3rd Rail are essential landmarks on the fret board. We've already examined these positions in this post. The next diagram shows all the major 3rds spanning the 3rd Rail up to the 17th fret (If your guitar has 24 frets then you also get one there);

Roman numerals indicate repective positions of major 3rds rooted on 3rd string.
The minor 7th chords rooted on the 4th string all pass through the above positions;
Lower case Roman numerals indicate root positions of minor 7th chords rooted on 4th string.
If we extend these 7th chord forms a 3rd above and below, we then have a set of 11th chords;
Roman numerals indicate root positions of 11th chords on 4th string.
We have previously treated these low note extensions as integral parts of the 7th chords, but now we'll look at them in their own light. We'll start with the chord which radiates from the central axis position; the 5th fret in the key of C where the tonic major 3rd is positioned;
This chord form is only playable as an arpeggio because several notes are found on the same strings and it is spread out over too many frets, but an arpeggio is still considered a chord because of its harmonic structure
Here's the chord on the piano keyboard;
In this position – starting from the center and moving outward – we first find the C major 3rd (C-E), the A minor 7th chord (A-C-E-G), then the F major 11th (more precisely F major 7 #11), consisting of six notes (F-A-C-E-G-B). So this form is, starting from its lowest note, is the F major 11th chord – rooted in the fourth scale degree.

The F major 7 #11 can be broken into 4 triads;
The following diagrams show the shapes of the chords indicated in the notation above. Each three note sequence is a section of the overall extended 11th chord arpeggio;

The F major and E minor are only playable as arpeggios because they have two notes on a string, while the three notes of the C major and A minor can be arpeggiated or strummed or plucked together.

All seven of these extended arpeggio forms can be treated the same way. Play the notes of each form in consecutive three-note sequences (triads) starting from the low note, then from the highest note of each form.

Of course, any of these forms can also be played in other note grouping combinations. For instance, in addition to the triads shown above, each extended arpeggio form can also be split into three 7th chords – not just the central 7th chord we began with. Below is notation showing the three 7th chords within the F major 7 #11 arpeggio;
Lets look at the interval structure of all of the diatonic 11th forms based on their scale degrees;


The dotted line in the diagram above separates the first two chords from the next four because the IV, II and VI chords all have internally symmetrical interval structures, while each of the others is individually asymmetrical, though they are all part of a larger symmetry. Also notice that the only two which share the same interval structure are rooted in scale degrees II and VI.

Next: 3rd Rail Chord Symmetries (Part 4), we'll examine the triads if the major 7th extended forms which become the II and VI rooted 11th chords.


All contents of this blog are © Mark Newstetter

Sunday, December 18, 2011

3rd Rail Chord Symmetries (Part 2)

In the previous post, we examined the three minor 7th chords rooted on the 4th string and centered on the 3rd Rail, then added notes a third above and below the original four-note chord. The added high note is actually a 9th, and – since we are keeping the original chord root – the added low note can be thought of as a 6th (or a 13th).

Here's another example: If we take the tonic major 7th chord (C maj7) with the notes C-E-G-B as the Root-3rd-5th-7th respectively, the D added above the B of that chord is the 9th of the chord. The five notes comprise a C major 9th. The A added below the C is – theoretically – also a 6th above C. 6ths in chord structure are thought of as 13ths when added to 7th chords (or 9th chords), so the whole six-note sequence can be considered a C maj 9 add 13. And because the 13th (A) is now the lowest note in the chord, it may be called C maj 9 add 13/A. In chord naming, when a note other than the root is played as the lowest pitch, it is added to the chord name following a slash. The diagram below shows the relationships of these notes on the staff;
If we were to use the added low note as the root of these extended forms, we would call them 11th chords. For instance; A-C-E-G-B-D would be called an A minor 11th, F-A-C-E-D-G-B would be an F major 11th (actually, an F maj7 #11), etc. Of course, any three consecutive notes an a series of 3rds is a chord, so the sequence A-C-E-G-B-D contains four three-note chords; A min, C maj, E min, G maj. So you can choose to slice these patterns any way you want. However, the 7th chords comprising a single note on each of the four top strings are the most clearly symmetrical forms, and make a good core structure for purposes of study and practice, as well as providing clear landmarks for improvising and composing.

There are two major 7th chords in any major key. These are the 4th-string root position major 7ths in the key of C. They are F maj7 and C maj7, the I and IV chords of the key of C.;
The notes are shown in descending order on the staff because it visually follows their layout in the fretboard diagram.
Play the notes in ascending and descending sequences.
Here are the extended patterns of the above chords;
This pair of extended major 7ths have the unique characteristic of being the only two identical extended chord forms, and are each internally symmetrical – comprising two minor-major-minor-major-minor-3rd sequences.

Here's the  extended 6th scale degree minor 3rd (A minor) between the two major 7ths;
F major 7th - A minor 7th and C major 7th extended arpeggio forms.
Here's the same configuration in the key of D;

G major 7th - B minor 7th and D major 7th extended arpeggio forms.
... and in the key of A;
F# minor is shown in the lowest and highest positions, around the A maj. 7th and D maj. 7th.
Returning to the key of C, here are the extended G dominant 7th (rooted on G at the 5th fret) and B minor 7 b5 (rooted on B at the 9th fret);
The extended dominant 7th becomes an E minor 11 b9 when the lowest note is taken as the root.
The extended B minor 7 b5 becomes a G dominant 11th when its lowest note is taken as the root.
These chords are shown below as they are positioned on the piano keyboard;
Here's the notation for these two extended chords. Notice that their interval patterns (and their geometry) are the exact opposite of each other;
Now let's look at the major 7ths, the dominant 7ths and the minor 7 b5 chords all together on the fret board;
These chord forms overlap in interlocking patterns, all based on the symmetry which is centered on the 3rd Rail. Remember that – by most accounts – the odd tuning of the interval between the 2nd and 3rd strings is a flaw – a glitch. But by treating that 'odd' interval as the fulcrum of the fret board, we see that there are very useful symmetries which stem from it.

In PART 3 we'll continue to explore the possibilities of these arpeggio forms.


All contents of this blog are © Mark Newstetter

Saturday, December 17, 2011

3rd Rail Chord Symmetries (Part 1)

Here's an set of patterns which make clear use of the 3rd Rail symmetry to simplify navigation. We can think of 7th chord arpeggios as spirals radiating around a central interval. For instance; the central interval (3rd–5th) in a minor 7th chord is a major 3rd. If the chord is rooted on the 4th string and played as a series of 3rds, the central interval will span the 3rd Rail and the overall shape of the chord will be perfectly symmetrical – therefore, easy to visualize. In Fretography this is the concept of 'centered chords'.

This diagram illustrates the basic principle. Starting with a 3rd interval as the center of the chord, we extend the chord an additional 3rd in both directions, so a 3rd becomes a 7th, then an 11th;
The chords we will study in this exercise are mostly arpeggios, which are chords that are played note by note rather than strummed. Knowing your arpeggios can really enhance your improvisations and your playing overall. Playing a chord as an arpeggio is necessary on the guitar when some of the chord's notes are on the same string and so can't be played at the same time. This is sometimes referred to as a "broken' chord. (We looked at some rudimentary arpeggios in a previous post.)

Below is the A minor 7th arpeggio of the key of C, rooted on the 4th string;
The notes  are shown in descending order on the staff because it visually follows their layout in the fretboard diagram.
Play the notes in ascending and descending sequences.
See how the two minor 3rds within the chord radiate out from the central major 3rd. Now let's look at what happens if we add notes 3rd above and below this chord;
Italic numbers indicate fingering. Fret positions are indicated by bold non-italic numbers. 
Original 7th chord tones are black, added notes are red.
The symmetry is clear. Of course, we can choose to make F the root of this new set of notes, in which case you are looking at an F major 7th sharp 11 arpeggio. But, for our purposes, we will treat the F and B as extensions of the original A minor 7th chord. Play this arpeggio slowly – ascending and descending – using the indicated fingering.

There are three minor 7th chords in any major key. They are rooted in the 2nd, 3rd and 5th scale degrees (D, E and A in the key of C). Though all three of these chords have the same interval structure, their positions in the key give rise to a different set of extended intervals for each.

Below is the extended minor 7th arpeggio rooted on the 3rd scale degree. Notice the same geometry of the central minor 7th chord (EGBD);
This is an E minor 7th, with diatonic 3rd extensions above and below. The C is a major 3rd below the root, and the F is a minor 3rd above.

There's one more minor 7th chord in the key of C. It is rooted on the 2nd scale degree, and it is D minor. The central minor 7th structure (DFAC) is the same as the two previous examples, but notice that it's the geometric and intervallic opposite of the iii chord – E minor.
Below are the three extended minor 7th arpeggios side by side. The vi chord is placed in the middle to emphasize their overall geometric symmetry. Remember that these forms will be in different fret positions in each key but will always retain their relative geometry based on their scale degrees.


Let's look at these chord forms as they are actually arrayed on the fret board.

Below you see the minor 7th arpeggio rooted on the 2nd scale degree. This time the chord is shown in its natural position on the fret board;
You can see that the geometry of this chord is the opposite of the previous example (the iii chord – E minor). 

Here's the E minor again, with the whole fret board shown around it;
... and the extended A minor 7th;

Remember that these chords are extended versions of these minor 7th chords;
Here are all three extended minor 7ths in their actual positions in the key of C;
... and here's the same set of extended minor 7ths in the key of G;


Next we'll look at the four remaining 7th chords in the Key of C; C major 7th, F major 7th, G dominant 7th and B minor 7 b5.


All contents of this blog are © Mark Newstetter

Friday, December 9, 2011

The 3rd Rail ( The G & B Strings ) Part 2

What's the best way to think of the 3rd Rail? How can you avoid hitting a wrong note when you move across it? Can't the guitar just be tuned so all the strings have the same intervals between them?

Actually there is a school of thought that a uniform tuning is the solution. Some tune the guitar to 'All 4ths' (E A D G C F) in order to avoid the issue of compensating for the odd interval. But - as stated in the previous post - most guitarists continue to use the standard E A D G B E tuning because it (probably) offers the best overall set of musical possibilities and because the vast majority of resources are available to guitarists in standard tuning. If you've found advantages to other tunings, more power to you. But if you are interested in getting the most out of standard tuning, then you'll want to come to terms with the 3rd Rail.

Think of it as a small hill. When you ascend from the 3rd to the 2nd string, you shift up a fret. When you descend from the 2nd to the 3rd string, you shift down a fret;
Because the interval of a Perfect 4th (W-W-H) is one half-step larger than a Major 3rd (W-W), shifting up one fret when crossing from the 3rd to the 2nd string will produce a Perfect 4th, while moving from the 3rd string to the 2nd string on the same fret produces a Major 3rd. Since there is a Perfect 4th between all the adjacent strings except the 2nd & 3rd, you can think of the Perfect 4th as the 'default interval' when crossing strings. So, when you cross from the 3rd to the 2nd string, think of a Perfect 4th as the norm. To do this, you only need to remember to shift up a fret when you go from the 3rd to the 2nd string, and go down a fret when going from the 2nd to the 3rd string.

Try playing all the notes on the 5th fret one by one from the lowest string to the highest; A - D - G - C - E - A. These are all 4ths except C - E, which is a major 3rd. If you were to play a series of 4ths starting from the same note, you would play the notes; A- D - G - C - F - Bb. Below is notation and tablature for this exercise;
Think of the 'Same Interval' sequence above as the default path for crossing all six strings.

Below is a diagram showing all the natural tone (key of C) Perfect 4ths on the fret board between adjacent strings, connected with green bars;
Notice that the diagram is divided between the upper four strings and the lower three strings. This is to emphasize the symmetries within these groups. Below are separate diagrams for each string group;
Upper String Group 4ths
Lower String Group 4ths
There are two notes on the fret board which are not part of these adjacent string 4ths; the F on the 1st fret of the 6th string, and the B on the 7th fret of the 1st string.

Also, within the Upper String Group, the F on the 3rd fret of the 4th string is isolated from the 4ths, but is a counterpart to the 1st string B. Similarly, the 4th string B in the Lower String Group is a counterpart to the 6th string F.

The interval from F to B is an Augmented 4th (W-W-W), which is a half-step larger than a Perfect 4th (W-W-H), so these two notes do not align when they are in adjacent string/fret positions.

Remember that starting from the middle (5th fret) and moving in both directions from there is preferable if you want to really absorb the symmetries.


Sunday, December 4, 2011

The Third Rail (The G & B Strings)

What happens between the 2nd & 3rd strings on the guitar ... the G & B strings? There's a long and complex history behind the tuning of the guitar, which we won't go into here ... (google it) ... but to say that at some point the decision was made to tune the 1st & 6th strings to the same note, two octaves apart, and that those strings would be tuned to E. Because there are 6 strings on the guitar, there is no way to tune them all to the same interval and still have the same note on the highest and lowest strings. If most of the adjacent string pairs are tuned to Perfect 4ths, one of the pairs must be tuned to a Major 3rd. That major 3rd falls between the G (3rd) string and the B (2nd) string in standard tuning;
The result of this tuning is that scale patterns and chord forms are broken into various forms depending upon whether or not they cross between the oddly tuned strings. It's a compromise which makes barre chords possible, and it actually makes certain chords in the upper strings easier than they would be were the strings all tuned to 4ths. Of course not everyone accepts this tuning compromise, and there are numerous alternate tunings for the guitar. But the vast majority of guitarists are willing to work within the boundaries of the EADGBE or P4th - P4th - P4th - M3rd - P4th tuning.

In Fretography, the Major 3rd interval between the 2nd & 3rd strings in called the 3rd Rail. The 3rd Rail is a landmark on the fretboard map. It is a juncture – a turning point, or set of turning points. If you think of it the right way, it stops being an obstacle and becomes a useful navigational tool.

Remember that the 3rd Rail is the middle latitudinal axis of the upper string group's symmetry;
Any tonal interval occurring between any other two adjacent strings will be a different shape if it spans the 3rd Rail. For instance; a major 3rd played between the 2nd & 1st, 4th & 3rd, 5th & 4th or 6th & 5th strings will be a short diagonal, spanning two strings and two frets, while a major 3rd spanning the 3rd Rail will cross between the strings in a single fret position;

Compare the sound of the major 3rds in the upper string group (light blue). They are all the same pitches. The dark blue diagonals in the lower string group are an octave lower. All the major 3rds in both octaves are the same shape on the fret board except the one in the 3rd Rail.

There are three single-fret major 3rds in the 3rd Rail in the key of C: The G major 3rd of the open strings (and 12th fret), the C major 3rd of the 5th (and 17th fret), and the F major 3rd of the 10th (and 22nd fret). The symmetry of these positions is shown below;
These three fret positions are the three axis positions, which are indispensable in navigating the fret board.

Next post; The Third Rail - Part 2.


All contents of this blog are © Mark Newstetter

Wednesday, November 23, 2011

Voyage to the Bottom of the Staff - Part 2

The Grand Staff is the standard system for written piano music. As a guitarist you may want to be able to read music written this way. If you already read guitar notation, you are used to reading in treble clef. You are also used to playing pitches an octave lower than their standard pitch because guitar music is written an octave higher than it sounds. So, reading in standard pitch, as you'll have do when reading music written for piano or voice, requires a change of attitude.

The diagram above shows all the notes on the grand staff in a symmetrical pattern. We use symmetry in the Fretography method because it strengthens cognition. When you study the note-pairs in the symmetry you'll be able to see connections between notes even when they are far apart in pitch. This is useful whether you are reading in standard pitch, or – more typically for guitar – transposed in treble clef.

The symmetries of the individual treble and bass clefs have been explored in previous posts. Now we are looking at the overall symmetry of the combined bass and treble staves. Pay special attention to the notes of the open strings on the staff as indicated at the right of the diagram. Of course these same pitches are found in various places on the fretboard. Learn to associate the each note on the staff with all of its fretboard positions starting with the notes of the open strings, then adding C and F.

Notice that C is the central note within the grand staff, and that middle C can be written one leger line below the treble staff and/or one leger line above the bass staff. Also note that the positions of B and D are mirrored between the two staves, as are E - A, and F - G.

Below is a comparison of the positions of middle C on the fretboard, the grand staff (standard pitch) and transposed for guitar on the treble staff;
We should mention that there actually is a special treble clef – the octave-down or octave-dropped treble clef – which serves the purpose of indicating that the notation is transposed;
The little 8 hanging from the bottom of the clef indicates that the notes on the staff are played an octave lower than written. You will occasionally see this clef used for guitar music, though the transposition is usually assumed even when a standard treble clef is used.

The more familiar you are with the positions of notes on the fretboard, the easier it will be to transpose.

Try playing melodies you already know in different octaves. One difficulty is that you may need to employ different fingerings when playing the same melody in a different octave. If you take a systematic approach, this will be less of an issue. The usual reason for fingering changes is that in one octave range, the melody may be within the four lower strings, and when it's transposed it crosses the 2nd and 3rd strings (what I call the 3rd rail.), thus requiring an adjustment to compensate for the different relative tuning between those strings.

Here's a simple rule; When you are ascending from the 3rd to the 2nd string, you must shift up one fret to maintain the same interval pattern of the lower 4 strings. When you are descending from the 2nd to the 3rd string, you must shift down one fret. In other words; when you go up you add a fret ... when you go down you subtract a fret.

We'll look at the shift between the 2nd and 3rd strings in greater detail in a future post.


All contents of this blog are © Mark Newstetter

Tuesday, November 22, 2011

Reading Notation: Voyage to the Bottom of the Staff

Prepare yourself for a geeky look at a slightly obscure aspect of music theory for the guitar. What you are about to read, should you proceed beyond this introduction, will require both courage and patience - traits which are not often found in the same individual. But if you are one of those rare guitar players who is willing to stretch your synapses, read on.

Guitar music is usually written in the treble clef, transposed on the page an octave higher than its true pitch. For instance, the note pitch of middle C falls here in guitar notation;
... and here in piano notation;

Both of these notes are the same pitch on their respective instruments when played as written, but the piano follows the standard, so notation for the guitar is actually written an octave higher than standard. What this means in practice is that music written specifically for guitar will take into account the proper octave transposition - so the notes will be in their intended pitch, but if you play music written for piano or voice on the guitar, you will sound an octave too low, so you have to compensate by playing an octave higher than you would if the music was written for guitar.

For example; here is a melody written for piano;
First example.
... and the same melody written an octave higher on the staff for guitar but sounding the same pitch as if they were played on the piano from the example above (including tablature for reference);
Second example.
Both examples above will sound the same if played as written for each instrument. In other words, the pitch of the notes indicated on the tablature is actually the pitch of the notes indicated on the piano version of the melody in the first example. As you can see, the guitar notation places the notes higher on the staff. Notice that the Gs on the piano staff are two ledger lines below the staff.

If you were to play the melody notated for the piano in the first example as if it were written for guitar it would sound an octave lower;
Third example.
However, this would be wrong if you were trying to play what the piano was intended to play, since the intended pitch of the notation for the piano is an octave higher than the tablature shown here. As a guitarist reading notation for piano, you have to make the mental shift to the octave shown in the second example above, so it sounds an octave higher.

Here's the melody one more time with tablature indicating its 'true' pitch;
Fourth example.
As you can see, the true pitch of the notation of this melody on the fretboard is around the middle of the guitar's range – but low enough on the treble staff that going lower would require using the bass clef.

Here is the lowest note on the guitar (the open low E string) as written for guitar;
... and here is the same note as written for piano (its true pitch);
Piano music is written on the 'grand staff' which includes bass and treble clef.
As you can see, the open low E string on the guitar is quite low. So - as a rule - guitar notation is shifted an octave higher on the staff.

Now, suppose you have sheet music written for piano which you want to play on the guitar. You may have to make some changes in terms of chord voicings. But do you really have to re-write everything onto the treble staff, or should you just read it as it's written?

The great jazz guitarist and composer Johnny Smith is a firm believer that guitarists should read and write music on the grand staff, rather than transposing to the treble staff. Though this is not a majority view, there is certainly some merit to the idea. Being able to read in the bass clef has several benefits. Aside from being able to read piano music and play it on the guitar, you will be conversant with bass players, who read in bass clef. Interestingly, because the bass is so low, it also transposes, so the bass sounds an octave lower than written.

While the treble clef is a stylized letter G, The bass clef is a stylized letter F. The two dots on the clef surround the line of the staff assigned to the note F. Below you see the names of the notes on the bass clef;
Notice that the central note of the bass clef is D, also that E is one leger line below the staff and C is one leger line above.

The diagram below shows the symmetry of the notes on the bass clef;

Interestingly, the symmetry of the bass clef is centered around the note D, just like the Fretographic symmetry of the guitar fretboard.

Notice that the true pitch of the open strings of the guitar brings them will into the bass staff. Only the notes of the open 1st and 2nd strings are placed above the staff.

Now let's compare the bass symmetry with that of the treble staff;

(To review the treble staff symmetry in depth - read the previous entry here)

The respective symmetrical note-pairs are shown in boxes above the treble and below the bass staves. The diagonal dotted lines in the middle are connecting the equivalent central notes of the two staves to draw attention to their symmetrical positions across both staves. The note positions of the open strings are indicated to the right. Notice that the upper part of the bass and lower part of the treble staff include the same notes. For instance; the lowest E on the treble staff (below the 3rd leger line) is actually the same pitch as the E in the center of the bass staff. Likewise, the highest A indicated on the bass staff (above the 3rd leger line) is the same pitch as the A in the middle of the treble staff.

In piano music, the bass staff is used to indicate notes which are played with the left hand on the piano. The treble staff indicates notes played with the right hand. The two staves may therefore overlap so that the left hand can occasionally move into the territory of the right hand and vice versa.

Being aware of the note relationships on the staff, with or without the guitar at hand, will widen your musical horizons. Spend some time just studying the treble and bass staves. Memorize the note positions so that you can close your eyes and picture them. That's the first step to being able to connect the concept of music as sound with music as written language.

Still with us?

To be continued ....


All contents of this blog are © Mark Newstetter