Friday, August 30, 2013

Super Arpeggios

Theoretically simple arpeggios are not so simple on the guitar. Playing the sequences of major and minor thirds which, at the simplest, can be expressed as "every other white key on the piano;"

Because arpeggios are actually chords, the notes in an arpeggio may be numbered accordingly. The first note of a simple arpeggio is the Root. The keyboard diagram shows an extended G dominant arpeggio in the key of C;

The equivalent arpeggio on the guitar is shown below;

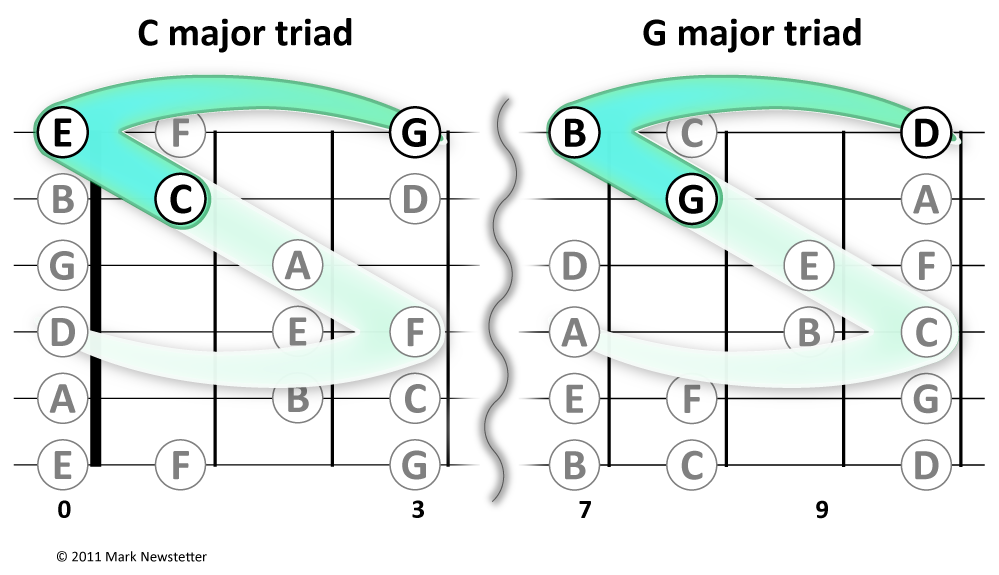
If the convoluted blue pattern above is confusing, try breaking it in half. Here's the upper part;
... and the lower part;


As you can see, each half of the full extended arpeggio is quite symmetrical. When combined the form is more complex, but visualizing the dual symmetry makes it easier to navigate.

There are seven super-arpeggios in this system. Below you see them all, labeled for the major scale degree on which each one is rooted;

You can treat these arpeggios as we've done with the G dominant, playing the lower three strings and the upper four strings of each separately, then joining the upper and lower forms.

Here's notation for all nine patterns shown above;


Here are sound files of each 6-string arpeggio as shown in the diagrams and notation above;


... E Mediant (Open position) Arpeggio
... G Dominant (3rd fret) Arpeggio
... B Leading Tone (7th Fret) Arpeggio
... D Supertonic (10th Fret) Arpeggio
... F Subdominant (1st Fret) Arpeggio
... A Submediant (5th Fret) Arpeggio
... C Tonic (8th Fret) Arpeggio
... E Mediant (12th Fret) Arpeggio

You can find  more about arpeggios elsewhere in this blog.


All contents of this blog are © Mark Newstetter

Thursday, August 22, 2013

The Holistic Fretboard


You are looking at layers of tonality. Each color and shape represents a different aspect of the diatonic key of C. The layers are translucent, allowing multiple elements to be seen simultaneously. Obviously this particular view of the guitar fretboard is of limited (if any) practical use — it is mostly an aesthetic exercise — but peel the layers away, and these multi-colored, geometric tonal groupings reveal the true harmonic nature of the instrument.

Saturday, August 3, 2013

Hidden Diamonds

Here's a pattern that will reveal a lot about the nature of the fret board. In Fretography, the yellow field in the diagram below is called the Mixolydian Super Zone. Notice that its lowest note is on the 5th scale degree. This is a very useful pattern in that it spans a wide range in the center of the key system. In the key of C major, it runs from the 3rd to the 7th fret.

In the notation above, you'll see that there is a unison D on the 3rd and 2nd string. When playing this pattern it's a good idea to play both D's because their positions are an essential part of the symmetry. Knowing where both of these positions are will really help you find your way around. Remember that D is the only note in the key which is found in such a symmetrical relationship with itself.

The diagrams below show the Mixolydian Super Zone (yellow) and the Hidden Diamonds (blue). Each  diamond has a D (green star). The upper diagram shows the pattern as scale degrees, the lower shows note names. You can use the scale degrees to understand how this pattern works in any key by shifting it to different fret positions.

The two diamond shaped blocks comprise four triads. One diamond contains the notes D, B, F and A — the other; D, F B and G. These notes produce the following chords: D minor 1st inversion, G major 2nd inversion, and both a 1st and 2nd inversion of B diminished. The following notation shows these four chords ...


The symmetry of this group of chords is very strong. Study the diamonds in the diagram and notice the positions of the following pairs of notes; A—G, F—B, D—D. These pairings correspond with the overall symmetry of the Diatonic system. Notice the role of D in all four chords. Also notice the shifting inner tones — B, A, G, F which descend through the tritone.

The notation below shows the same ida with the two last chords shifted down an octave to emphasize the descending inner tones (blue) ...

To clarify the symmetry, the diagram below shows the pattern broken into its upper and lower string groupings ...

In this closeup of the upper four strings, pay special attention to the relationships of the following pairs of notes; I — III, IV — VII, V — VI and II — II. These notes will always fall in rotationally opposite positions across the string group, from the center outward.


Now let's look at the same notes in the lower string group, an octave down ...
And a closeup of the lower forms. Notice that II is at the very center of the array and in the upper left and lower right corner. Again, look for the I — III, IV — VII, V — VI and II — II note relationships ...
The next of the "diamonds" are actually triangles spanning the upper strings of the Void position which comprises the 10th through 12th frets in the key of C. In any major key, the tonic will be on the 4th string within the Void Zone.

In the diagram below you see all three basic forms with the Void in the center and the upper & lower strings separated ...

Here's notation for a riff in the key of G major, using the lower shapes shown above and the void position triangles ...


Finally, here's a diagram of all the "diamonds" within the lower four strings ...

Look at the connected forms in the center of the lower four strings. Notice that the combination forms root triads II - IV - VI and V - VII - II, or D minor and G major in the key of C. This cluster highlights tritone which is common to both diamonds.

All together these hidden diamonds contain five of the seven notes of a major key; II, IV, V, VI and VII. Only the Tonic and the 3rd are left alone. 


All contents of this blog are © Mark Newstetter

Sunday, September 23, 2012

3rd Rail Chord Symmetries (Part 4)

Red diagonals indicate minor 3rds spanning the 3rd Rail. Roman numerals indicate their respective scale degrees.
Above you see the positions of the minor 3rds which span the 3rd Rail in the key of C. Each of these double-stops are at the center of a 7th chord. Two of them – the vi and the iii (dark red) – are each the center of a major 7th chord. The other two – the vii and ii (pale red) are the centers of two different types of chords. The ii is the center of a B minor7 b5 (also called 'half-diminished') chord, and the vii is the center interval of a G dominant 7th.

In the diagram below, you see the two major 7th chords which pass through the above min3rd positions. The IV chord (F maj7) radiates from the a minor 3rd at scale degree vi, and the I chord (C maj7) radiates from the E minor 3rd at scale degree iii;
Roman numerals indicate scale degree of each major 7th chord root.
If we extend these 7th chord forms a 3rd above and below, we then have a set of minor 11th chords. Each of these extended forms radiates from a different part of the key, even though they have the same geometry;
Roman numerals indicate scale degree of each minor 11th root.
If we focus on these two extended arpeggios side by side, with some in-between frets removed for a better view, we see that their internal structures are identical. The form on the left is rooted in the second scale degree (D), the form on the right is rooted in the 6th scale degree (A)
The D minor 11th arpeggio (left) can be played from the open strings as indicated, or from the 12th fret.
The diagram below shows the centered interval structure of the two forms;
And here's where these two arpeggios are played on the piano keyboard;
The only way to distinguish one of these forms from the other from a geometric perspective is to look at the relationship between each of the arpeggios and the positions of the notes which surround each one. Because of their differing positions within the key, these 11th chord-arpeggio forms live in different surroundings on the fret board. We'll go more deeply into those relationships in a future post. For now, lets look at how each of these two big S shapes break into four triads;

Each three-note sequence in these forms is its own triad. Of the seven triads belonging to the key of C, six are present in these forms; C major, D minor, E minor, F major, G major and A minor. The remaining triad – B diminished – is found in both of the remaining 11th chord arpeggio forms. 

Remember that the D minor 11th arpeggio can be played either rooted in the open string D or at the 12th fret.

Next: 3rd Rail Chord Symmetries (Part 5) – we delve into extended Dominant and Leading Tone Sevenths ...


All contents of this blog are © Mark Newstetter

Monday, December 19, 2011

3rd Rail Chord Symmetries (Part 3)

So far we've examined the 7th chord forms which radiate around the 3rd Rail – that problematic nexus of the 2nd and 3rd strings. By treating it as a fulcrum or the center of gravity of the fret board, it becomes a useful organizing element. No longer a problem, but a solution.

Here's the interval structure of the four types of diatonic 7th chords in the major keys, based on the major and minor 3rds which occur between each chord degree;

Dotted line separates symmetrical and asymmetrical chords based on their interval structure.

Notice that the major 7ths and minor 7ths have opposite interval structures. The same opposing symmetry is true of the V and VII chords. Because these symmetries are integral to the chords' structure, it's logical that they play out on the fret board as geometrically symmetrical patterns.

The center interval in each of these 7th chords spans the 3rd Rail. Only the minor 7th chords have a major 7th in their centers. It takes a change in perspective to think of chords from the center outward, rather than from the bottom up, but it will give you a much more sophisticated understanding of harmony and a greater command of the fret board.

––––

The three minor 7th chords are rooted on the 2nd, 3rd and 6th scale degrees of a major key. The major 3rds at the center of these chords are rooted on the 4th, 5th and 1st scale degrees, respectively.


The I - IV - V center intervals on the 3rd Rail are essential landmarks on the fret board. We've already examined these positions in this post. The next diagram shows all the major 3rds spanning the 3rd Rail up to the 17th fret (If your guitar has 24 frets then you also get one there);

Roman numerals indicate repective positions of major 3rds rooted on 3rd string.
The minor 7th chords rooted on the 4th string all pass through the above positions;
Lower case Roman numerals indicate root positions of minor 7th chords rooted on 4th string.
If we extend these 7th chord forms a 3rd above and below, we then have a set of 11th chords;
Roman numerals indicate root positions of 11th chords on 4th string.
We have previously treated these low note extensions as integral parts of the 7th chords, but now we'll look at them in their own light. We'll start with the chord which radiates from the central axis position; the 5th fret in the key of C where the tonic major 3rd is positioned;
This chord form is only playable as an arpeggio because several notes are found on the same strings and it is spread out over too many frets, but an arpeggio is still considered a chord because of its harmonic structure
Here's the chord on the piano keyboard;
In this position – starting from the center and moving outward – we first find the C major 3rd (C-E), the A minor 7th chord (A-C-E-G), then the F major 11th (more precisely F major 7 #11), consisting of six notes (F-A-C-E-G-B). So this form is, starting from its lowest note, is the F major 11th chord – rooted in the fourth scale degree.

The F major 7 #11 can be broken into 4 triads;
The following diagrams show the shapes of the chords indicated in the notation above. Each three note sequence is a section of the overall extended 11th chord arpeggio;

The F major and E minor are only playable as arpeggios because they have two notes on a string, while the three notes of the C major and A minor can be arpeggiated or strummed or plucked together.

All seven of these extended arpeggio forms can be treated the same way. Play the notes of each form in consecutive three-note sequences (triads) starting from the low note, then from the highest note of each form.

Of course, any of these forms can also be played in other note grouping combinations. For instance, in addition to the triads shown above, each extended arpeggio form can also be split into three 7th chords – not just the central 7th chord we began with. Below is notation showing the three 7th chords within the F major 7 #11 arpeggio;
Lets look at the interval structure of all of the diatonic 11th forms based on their scale degrees;


The dotted line in the diagram above separates the first two chords from the next four because the IV, II and VI chords all have internally symmetrical interval structures, while each of the others is individually asymmetrical, though they are all part of a larger symmetry. Also notice that the only two which share the same interval structure are rooted in scale degrees II and VI.

Next: 3rd Rail Chord Symmetries (Part 4), we'll examine the triads if the major 7th extended forms which become the II and VI rooted 11th chords.


All contents of this blog are © Mark Newstetter

Sunday, December 18, 2011

3rd Rail Chord Symmetries (Part 2)

In the previous post, we examined the three minor 7th chords rooted on the 4th string and centered on the 3rd Rail, then added notes a third above and below the original four-note chord. The added high note is actually a 9th, and – since we are keeping the original chord root – the added low note can be thought of as a 6th (or a 13th).

Here's another example: If we take the tonic major 7th chord (C maj7) with the notes C-E-G-B as the Root-3rd-5th-7th respectively, the D added above the B of that chord is the 9th of the chord. The five notes comprise a C major 9th. The A added below the C is – theoretically – also a 6th above C. 6ths in chord structure are thought of as 13ths when added to 7th chords (or 9th chords), so the whole six-note sequence can be considered a C maj 9 add 13. And because the 13th (A) is now the lowest note in the chord, it may be called C maj 9 add 13/A. In chord naming, when a note other than the root is played as the lowest pitch, it is added to the chord name following a slash. The diagram below shows the relationships of these notes on the staff;
If we were to use the added low note as the root of these extended forms, we would call them 11th chords. For instance; A-C-E-G-B-D would be called an A minor 11th, F-A-C-E-D-G-B would be an F major 11th (actually, an F maj7 #11), etc. Of course, any three consecutive notes an a series of 3rds is a chord, so the sequence A-C-E-G-B-D contains four three-note chords; A min, C maj, E min, G maj. So you can choose to slice these patterns any way you want. However, the 7th chords comprising a single note on each of the four top strings are the most clearly symmetrical forms, and make a good core structure for purposes of study and practice, as well as providing clear landmarks for improvising and composing.

There are two major 7th chords in any major key. These are the 4th-string root position major 7ths in the key of C. They are F maj7 and C maj7, the I and IV chords of the key of C.;
The notes are shown in descending order on the staff because it visually follows their layout in the fretboard diagram.
Play the notes in ascending and descending sequences.
Here are the extended patterns of the above chords;
This pair of extended major 7ths have the unique characteristic of being the only two identical extended chord forms, and are each internally symmetrical – comprising two minor-major-minor-major-minor-3rd sequences.

Here's the  extended 6th scale degree minor 3rd (A minor) between the two major 7ths;
F major 7th - A minor 7th and C major 7th extended arpeggio forms.
Here's the same configuration in the key of D;

G major 7th - B minor 7th and D major 7th extended arpeggio forms.
... and in the key of A;
F# minor is shown in the lowest and highest positions, around the A maj. 7th and D maj. 7th.
Returning to the key of C, here are the extended G dominant 7th (rooted on G at the 5th fret) and B minor 7 b5 (rooted on B at the 9th fret);
The extended dominant 7th becomes an E minor 11 b9 when the lowest note is taken as the root.
The extended B minor 7 b5 becomes a G dominant 11th when its lowest note is taken as the root.
These chords are shown below as they are positioned on the piano keyboard;
Here's the notation for these two extended chords. Notice that their interval patterns (and their geometry) are the exact opposite of each other;
Now let's look at the major 7ths, the dominant 7ths and the minor 7 b5 chords all together on the fret board;
These chord forms overlap in interlocking patterns, all based on the symmetry which is centered on the 3rd Rail. Remember that – by most accounts – the odd tuning of the interval between the 2nd and 3rd strings is a flaw – a glitch. But by treating that 'odd' interval as the fulcrum of the fret board, we see that there are very useful symmetries which stem from it.

In PART 3 we'll continue to explore the possibilities of these arpeggio forms.


All contents of this blog are © Mark Newstetter